

Before painting, I removed and labeled all the doors and drawers. I also removed the old laminate backsplash. Since it was attached to the side of the cabinets, I needed to sand the glue off the wood so that the paint would adhere and be smooth. I also did a general sand of all the cabinets and frames.

But what a difference just priming made!

All of the priming of the frames was done using a brush and roller. I did about two coats of primer, and then it was time to paint. I used Benjamin Moore Simply White Satin finish in the Advance paint line and applied three coats.

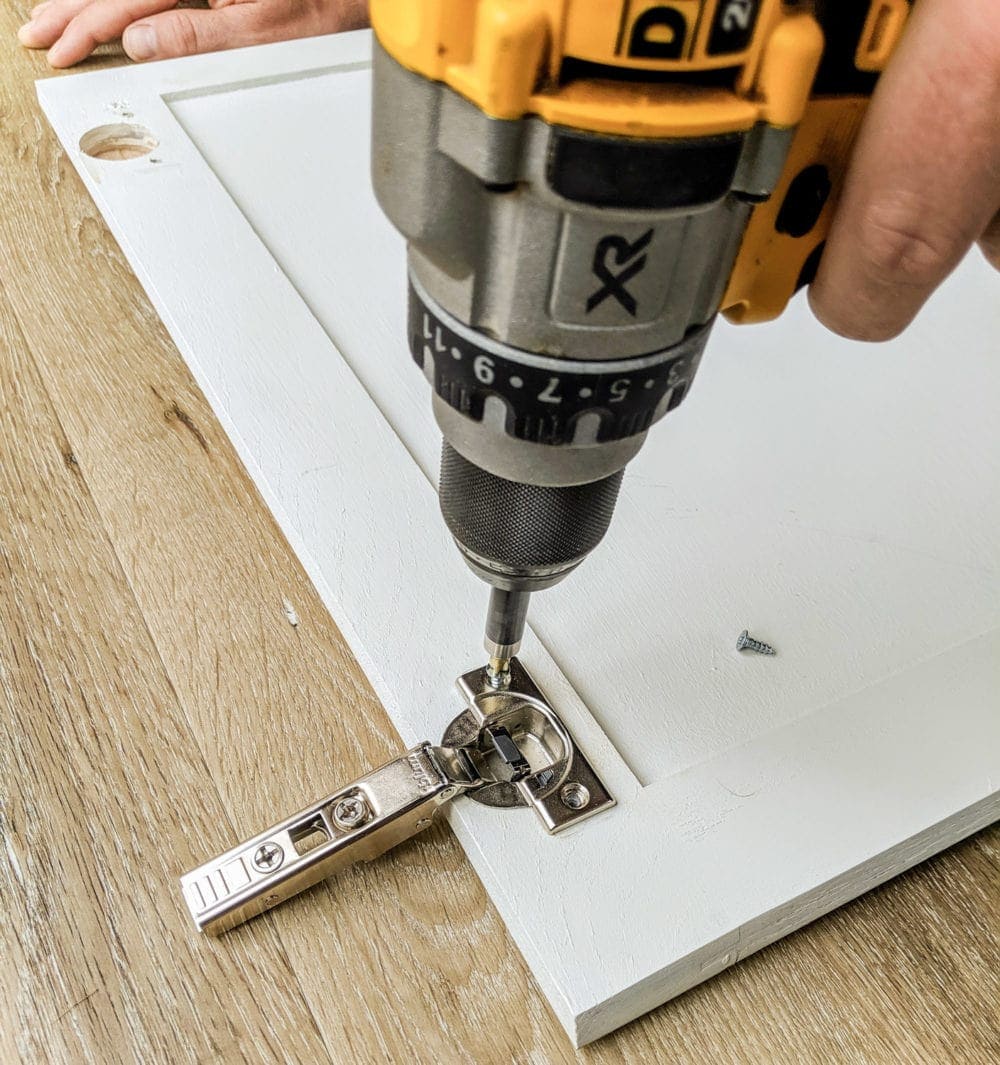
In between painting the frames, I started work on the doors. Before painting I drilled for the new hidden compact hinges. My hinges are referred to as overlay, because the door overlays the cabinet frame. To get the right size, I measured the distance the door 'lays over' the frame. Mine were 5/8" overlay...not a standard size sold at big box stores, but they were easily found online. I also purchased a template and forstner bit to drill for the new hinges. I measured, marked and drilled for each one before painting, so as not to damage the new paint job.

I didn't have the Kreg Jig template when working on my kitchen, but I've since helped my Mom and Dad add hinges to their kitchen cabinets. He purchased one and it was a great time saver on the project.


I sprayed the doors and set up my spray station outside and later moved to working in the basement.


After the final coat, I let them dry for another three days so the paint could harden before installing them. Again I have an older kitchen, so I ran into an issue when I began installing them. The first doors I put up were over my refrigerator, which had a newly built cabinet frame. It went up smoothly. The next ones, for the life of me I couldn't get to fit. It turned out that the old cabinet frames were SLIGHTLY thicker than the grips on the hinges. This prevented them from attaching and closing properly. I literally had to walk away from the project before I figured this out!

But once I realized it was the frame thickness, I found that I could work around it and push the back portion of the gripper INTO the frame so that they fit. And with that, I got all of the doors installed. They still needed a few of adjustments with the screws, but that was to be expected. Hopefully this can help the next person that runs into that problem.


Ashley and Mike over at Joyfully Growing have an excellent article about selecting and installing soft-close hinges--both compact and long arm. I love their advice and explanation about the difference between long arm and compact hinges. I think I would have chosen long arm hinges had I known that was an option.
The hidden hinges and paint made a world of difference in bringing the kitchen into the 21st century. Up next was to have new countertops installed.

(Post contain affiliate links. There is no charge to you if you click the links, but it allows me to make a small commission to help support this blog.)
{An 80's Kitchen DIY Reno Series}
-Part 9- Cabinet Painting and Compact Hinges
Hi-Can I ask how the Kreg jig helped with installing the hinges on your cabinets?
ReplyDeleteHi, there! I had to think for a minute and re-read my own post because I couldn't remember using a Kreg Jig! But yes, my dad purchased one for him and my mom's kitchen and I think it helped because we didn't have to measure and make pencil marks for every single hole. I believe once we set it up, we could just clamp it to each door and drill directly into the door. Forgive me, it's been over a year since we worked on theirs, but I think that was what saved time! Oh and there was also pretty much no way you could drill down to far into the door. I didn't necessarily have a problem with that on my doors, but it's sort of impossible to do with the jig. I hope that helps!
DeleteWhat color is your paint for cabinets- its gorgeous!
ReplyDeleteHi, it's Benjamin Moore Simply White OC-117. I used the Advance paint line in Satin. Thank-you!
DeleteLove your kitchen! Can you come to my house? What color BM paint did you use on cabinets? Also what is backsplash tile you used and countertops? I have a cabinet painter coming soon to paint my oak cabinets. Very nervous about painting but really want to update the house
ReplyDeleteHi, it's Benjamin Moore Simply White in the Advance paint line, satin finish. H
DeleteI came across your blog traveling down the Pinterest rabbit hole researching floor stain formulas. I am so impressed with your handy work! I have lots of doors and cabinets to paint and haven’t pulled the trigger on a spray gun yet. Which one did you use? What color of paint is on your cabinets?
ReplyDeleteHello! What color and brand of paint did you use on your kitchen remodel?
ReplyDeleteIncredible upgrade—so worth it! Kitchen Remodel Masters Houston
ReplyDelete