

You see it starts off with unfinished wood and super-tall legs. When I put together the first one, I was so anxious to get a look at the scale that I put it partially together before staining and glazing it. I followed the steps below on the second one, which prevents you having to wipe and tape off the drawer liners and rails for staining and glazing.


I didn't have many clamps, so I used 3/4" brad nails to help secure the boards in place while the glue dried.

Next, I added decorative liner to each drawer base. I got mine from Lowes, but I liked this option I found on Amazon as well.

via

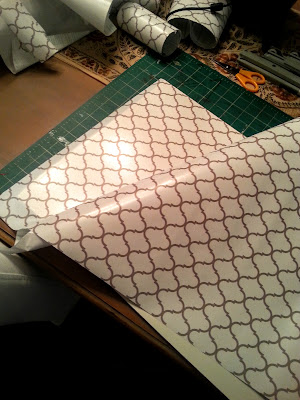
Cut it slightly larger than the drawer bottom, attach it, then flip it over and trim the excess with an exacto knife or box cutter.


Next up was the stain coat. I used Minwax Stain in the Provincial color.


The glaze was something I already had on hand, and couldn't find for sale anymore. But it was just a basic cream glaze. You could mix 1 part cream paint to 4 parts glaze like the one below to create the same effect.


After glazing the wood, it was time to put it together and conquer the 554 kajillion bits and screws.


Here's where I left off last week:

I was almost in the homestretch, but the hardware I ordered required that you countersink the back of the handle, which would have added a lot more work. I ended up switching out to this cup pull I have used before from Lowes in a bronze finish. But then it's screws were too long, so it was back to the store AGAIN for shorter screws. I finally got them on, and patched up the 2 holes I made for the first set of hardware. You see? I'm telling you this, so you don't make these same mistakes! i;ve linked a similar one below.


I've been playing musical furniture this week, moving things all around the house. I can't wait to show you what I've come up with this Thursday for the One Room Challenge!
Melanie, I am so inspired by your project. You did an amazing job. I love it so much! Thank you for sharing your tutorial.
ReplyDeleteThanks, Brandi! Hopefully the next person won't run into quite as many hiccups as I did!
ReplyDeleteI love how they turned out.
ReplyDeleteThanks, Renata!
DeleteDid you have to sand or prep this before you added the stain??
ReplyDeleteOops! Yes forgot to include that. I did a light hand sand with probably a 220 grit paper. Hope that helps!
DeleteOk so totally doing this, BUT what does the cream glaze DO exactly?? I know you stain, wipe off and then apply cream glaze, but what affect does it have on the piece? Was your glaze translucent or a color? My hubby just went to store and couldn't find just a basic cream glaze.
ReplyDeleteHi, Ashley! Glad you're going to try it out. The cream glaze against the brown stain creates the grey-wash finish. I had a bottle of premixed artist glaze, by Golden Paints, but couldn't find it for sale anymore. But you could buy and mix them on your own. I hope that helps! Let me know if you have any other questions!
DeleteSo what glaze do you recommend I buy to get the same effect you did? Sorry for all the questions! I've used stains before and paint, but never glaze!
DeleteI see there's translucent glaze and there's an antiquing glaze for sale. So I'm just not getting what color the glaze needs to be????
ReplyDeleteOk so I think I get it now: I need to buy a translucent colored glaze and add in a cream colored paint (1:4 ratio) in order to get the grey weathered look?? I'm so sorry I'm asking a ridiculous amount of questions!
ReplyDeleteIt's ok! Hey, I'm excited you're legitimately going to try the tutorial! But yes, the translucent glaze is colorless. Although I do believe the Ralph Lauren glaze at Home Depot can be tinted in store. Otherwise mix 1 part paint to 4 parts glaze, and go from there. Of course there are I'm sure some other tutorials on how to get the perfect weathered gray finish using a custom stain, but this is the method I've used for several projects.
DeleteThis comment has been removed by the author.
DeleteJust checked the Home Depot website to be sure, and it says that the glaze can be tinted in store and they sell the quart size, which would be more than enough for this project!
DeleteI'm baaaack!! Ok, just stained all pieces tonight. I'm getting glaze tomorrow! Ok, so how does one apply glaze?? Do I apply and then wipe off like wax with chalk paint? Or do I apply and let it dry? I've never used glaze before!
ReplyDeleteHey Ashley, yes, I just applied it, and rubbed it into the wood to get the grayish color and wiped off any excess. Sorry I am just now responding!
ReplyDeleteIt's finished!!! Finally!! Thank you!! I love it!! I posted on IG!
ReplyDeleteI posted on IG, but realized I never responded here, but your finished product looked awesome!
DeleteHi there! I am thinking of doing this to a dresser, I am just confused about the cream glaze. You showed a photo of Ralph Lauren glaze, would this happen to be the same one? -> https://www.homedepot.ca/en/home/p.1000807678.html <- Is so, do I just buy that as is and apply it as instructed? Or are there different colours and more to it than that?
ReplyDeleteSo sorry I am just now responding, probably no help at all!! But yes, the link you put in is the same glaze. It is clear, though, so you will have to mix it with paint to give it a color. But I generally mix 1 part paint to 4 parts glaze, then add more paint or glaze to achieve the translucence you are looking for. I hope that helps!
DeleteWhere is the lamp from? LOVE it! And thanks so much for this tutorial! We are going to do this soon!!!
ReplyDeleteHi, the original lamp is from Homegoods several years ago. The lamp in the final reveal is from Target-still a mercury glass lamp. I hope that helps! And I hope you will let me see your nightstand when you do!
DeleteHi, Melanie. I love your nightstand, it looks great! I especially appreciate your instructions, from the diagram, to detail in your step by step narrative and photos. Really great.
ReplyDeleteThank-you! I'm so glad you stopped by, and I hope you will let me know if you try it!
DeleteThis comment has been removed by the author.
ReplyDeleteI was wondering the height of the dresser now that you have cut the legs shorter? I love this Ikea hack but worry this may be a little too tall for a nightstand in my master bedroom!
ReplyDeleteHi, they were originally 36" high, and when I cut them down they were 32" high. I feel that the 32" was a substantial height for a nightstand. I hope that helps!
ReplyDeleteThank you, Melanie! That 4" makes a huge difference and the perfect nightstand height! Thank you for sharing this! Love your style and your home!
ReplyDeleteAny idea how much lattice you bought for the chest? Also, what color paint do I need to buy to mix in with the glaze? (The Ralph Lauren one). Or do you remember what you used from Golden Paints? I am doing this to the same chest over the weekend so would appreciate the help!
ReplyDeleteOoh. I can't remember ESC, but maybe about 5 strips? As far as the glaze, I don't know any of the RL colors, but I do love Cappuccino White by Glidden. Hope that helps and hope your project turns out well!
DeleteSorry, I meant, I can't remember exactly, not ESC!
DeleteHi Melanie! I am trying to recreate this look for a set of Rast dressers I purchased from Ikea. As many others, I am slightly lost when it come to the glaze. My question is, does the paint that is mixed into the glaze need to be grey? I noticed in the comments you mentioned Cappuccino White as a color you used with the glaze. Does this not give the dresser a much lighter finish? I am asking because I have some leftover paint (Gauntlet Grey-Sherwin Williams) that I used to paint an accent wall in the bedroom and wonder if that will help tie in the nightstands to the overall look in the room. Any help would be great! Thanks!
ReplyDeleteHi, yes my glaze was white and did lighten the stain finish, but it was the look I was going for. It gave the wood a slightly weathered gray finish that I love. Perhaps you could test out your paint color on a scrap of wood, and it may be the look you want!
DeleteLooks like I'm not the only one lost on the glaze part. I have the RL glaze, and I picked up a sample size (8oz) of Behr in the color "Frosted Toffee". I'll mix that into the quart of glaze. (Right so far?) The guy at Home Depot said I paint it on the entire dresser then wipe it off. I'm thinking of how it looks when you smudge nail polish when it's half dry and worried that's what it will do. Do I just use an old rag and gently wipe away? How long after putting it on do I start wiping? At one point the guy at HD said glaze leaves darker areas, then at another point he said it will make it lighter. Obviously I've never used glaze before.
ReplyDeleteTHANKS!! I hope mine is 1/2 as beautiful as yours!
I found your project on Pinterest, and I love it! The finished project looks lovely and much more expensive. I think I'm going to try to copy it. Thanks for your informative post!
ReplyDeleteHello! Love this hack, may I use a link to your page in my blog? Thanks
ReplyDeleteBrit
Sure!
DeletePretty good post. I just stumbled upon your blog and wanted to say that I have really enjoyed reading your blog posts. Any way I'll be subscribing to your feed and I hope you post again soon. Big thanks for the useful info.
ReplyDeletehouse hacking
Love this! I’m doing the same project on the same nightstand!
ReplyDeleteI have a question, is the glaze a necessity? What is the affect it has, as opposed to just staining and applying the polyurethane?
Thanks!
Hi Danielle, no it's not necessary. At the time I did mine, I don't think the gray-based stains were out so I was looking to get that driftwood finish. But there are so many color options now that you might find what you need pre-mixed off the shelf. It just depends on the color you are going for. Best wishes on your project!
DeleteI like you nightstands. I am going to try to talk my hubby into them. I also like that you did not add the feet. They look awesome!
ReplyDelete